2. Access Methods
2.1. Connection methods
The robot supports multiple connection methods. You can use any of them to access SDK functions.
Direct connection
- Wi-Fi direct connection: Set the connection method of the robot to direct connection and connect to the robot’s Wi-Fi hotspot.
- USB connection: Connect through the USB port on the robot’s smart central control. In this mode, support for RNDIS functions is required.
- UART connection: Connect through the UART port on the robot’s motion controller.
Networking connection
Networking connection: Set the network connection method of the robot to networking and add the computing device and the robot to the same LAN in order to network them.
2.2. Connection parameters
The parameters for Wi-Fi direct connection, Wi-Fi networking, and USB connection are described as follows.
IP address description:
- In Wi-Fi direct connection mode, the default IP address of the robot is 192.168.2.1.
- In Wi-Fi networking mode, the IP address of the robot is dynamically assigned by the router. The IP address of the robot in the existing LAN can be obtained by monitoring the IP broadcast data port and using it to connect to the robot.
- In USB connection mode, the computing device needs to support RNDIS functions, and the default IP address of the robot is 192.168.42.2.
Port and connection method description:
- For the UART connection method, see the description of UART parameters below.
Warning
Description of data in the UART connection method:
In UART connection mode, only control command/message push/event reporting data is available. If you need video stream/audio stream data, use the Wi-Fi/USB connection method instead.
2.3. Connection examples
The following examples illustrate how to use the connection methods based on the Python programming language. In all these examples, the Python 3.x environment must be installed as the default environment on your PC (for the installation of the Python environment, refer to Python Getting Started .
2.3.1. Wi-Fi direct connection
- Prepare the environment
- Prepare a PC with a Wi-Fi connection function.
- Establish a connection
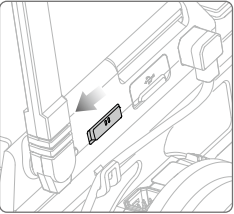
Turn on the robot.
Turn on the robot and set the connection method switch of the smart central control to the direct connection mode, as shown in the figure below:
Establish a Wi-Fi connection.
Open the wireless network access list on the PC, select the Wi-Fi hotspot name displayed on the sticker on the robot body, enter the 8-digit password, and then select “Connect”.
Prepare the connection script.
After establishing the Wi-Fi connection, we also need to program to establish a TCP/IP connection with the robot. The robot opens multiple ports for connection. To establish a TCP/IP connection, first connect to the control command port (in direct connection mode, the IP address of the robot is
192.168.2.1'', and the control command port is port ``40923) to enable the SDK mode of the robot.The following example uses the Python programming language to write a script in order to Establish control connection and enable SDK mode.
The sample code is as follows:
 1
 2
 3
 4
 5
 6
 7
 8
 9
10
11
12
13
14
15
16
17
18
19
20
21
22
23
24
25
26
27
28
29
30
31
32
33
34
35
36
37
38
39
40
41
42
43
44
45
46
47
48
49
50
51
52
53
54
55
# -*- encoding: utf-8 -*-
# Test environment: Python 3.6

import socket
import sys

# In direct connection mode, the default IP address of the robot is 192.168.2.1 and the control command port is port 40923.
host = "192.168.2.1"
port = 40923

def main():

        address = (host, int(port))

        # Establish a TCP connection with the control command port of the robot.
        s = socket.socket(socket.AF_INET, socket.SOCK_STREAM)

        print("Connecting...")

        s.connect(address)

        print("Connected!")

        while True:

                # Wait for the user to enter control commands.
                msg = input(">>> please input SDK cmd: ")

                # When the user enters Q or q, exit the current program.
                if msg.upper() == 'Q':
                        break

                # Add the ending character.
                msg += ';'

                # Send control commands to the robot.
                s.send(msg.encode('utf-8'))

                try:
                        # Wait for the robot to return the execution result.
                        buf = s.recv(1024)

                        print(buf.decode('utf-8'))
                except socket.error as e:
                        print("Error receiving :", e)
                        sys.exit(1)
                if not len(buf):
                        break

        # Disconnect the port connection.
        s.shutdown(socket.SHUT_WR)
        s.close()

if __name__ == '__main__':
        main()
Save the preceding code as rm_direct_connection_sdk.py.
Run the script.
Windows: After installing the Python environment, double-click the *.py file to run it. If you fail to run the file, press the
Win+Rshortcut command and enter ``cmd’’. Then, press Enter to open the CLI and enter ``python rm_direct_connection_sdk.py’’ to run the file.Linux: Press
Ctrl+Alt+Tto open the CLI and enterpython rm_direct_connection_sdk.pyto run the file.Establish a TCP/IP control connection.
When
Connecting...'' appears in the running window, the system is attempting to establish a connection with the robot. When ``Connected!;appears in the running window, the control connection has been established.
- Verify the connection
After successfully establishing the control connection, enter command on the CLI. If the robot returns ok;, the connection has been established and the robot has entered SDK mode. Then, you can enter control commands to control the robot.
- Other
For information about how to establish a UART physical connection, refer to UART.
2.3.2. Wi-Fi router mode
- Prepare the environment
- Prepare a PC with a network connection function (Wi-Fi or wired connection).
- Prepare a router.
- Establish a connection
Turn on the robot.
Turn on the robot and set the connection method switch of the smart central control to the networking mode.
Establish a networking connection.
For Wi-Fi:
If you are using a Wi-Fi connection, connect your PC to the router via Wi-Fi.
For wired connection:
If you are using a wired connection, connect your PC to the LAN port on the router via a network cable.
Ensure that the PC is connected to the router and open the RoboMaster app. In the app, go to the networking connection page, press the scan button on the smart central control of the robot, and scan the provided QR code to connect to the network.

Obtain the IP address of the robot in the LAN.
After the networking connection is established, your PC resides in the same LAN as the robot. Next, write code to establish a TPC/IP connection with the robot and connect to the control command port to enable the SDK mode of the robot.
If the router enabled the DHCP service, the IP address of the robot is dynamically assigned by the router, and you need to obtain the IP address of the robot in the LAN. There are two methods to do this:
- If you established the networking connection in the RoboMaster app, navigate to the Settings -> Connection page in the app, where you can see the IP address of the robot in the LAN.
- If you established the networking connection using another method, use Monitor robot address broadcasting to obtain the IP address of the robot in the LAN. For more details, see the Broadcasting section.
The sample code is as follows:
 1
 2
 3
 4
 5
 6
 7
 8
 9
10
11
12
13
# -*- encoding: utf-8 -*-
import socket

ip_sock = socket.socket(socket.AF_INET, socket.SOCK_DGRAM)

# Bind with the IP broadcasting port.
ip_sock.bind(('0.0.0.0', 40926))

# Wait to receive data.
ip_str = ip_sock.recvfrom(1024)

# Output the data.
print(ip_str)
Save the preceding code as rm_get_robot_ip.py and run the code to display the following output::
robot ip 192.168.0.115
By using Monitor robot address broadcasting you can see that the IP address of the robot in the LAN is
192.168.0.115.
Prepare the connection script.
After obtaining the IP address of the robot, use the Python programming language to write a script in order to Establish control connection and enable SDK mode.
The sample code is as follows:
 1
 2
 3
 4
 5
 6
 7
 8
 9
10
11
12
13
14
15
16
17
18
19
20
21
22
23
24
25
26
27
28
29
30
31
32
33
34
35
36
37
38
39
40
41
42
43
44
45
46
47
48
49
50
51
52
53
54
55
56
# -*- encoding: utf-8 -*-
# Test environment: Python 3.6

import socket
import sys

# In networking connection mode, the current IP address of the robot is 192.168.0.115 and the control command port is port 40923.
# Replace the IP address of the robot with the actual one.
host = "192.168.0.115"
port = 40923

def main():

        address = (host, int(port))

        # Establish a TCP connection with the control command port of the robot.
        s = socket.socket(socket.AF_INET, socket.SOCK_STREAM)

        print("Connecting...")

        s.connect(address)

        print("Connected!")

        while True:

                # Wait for the user to enter control commands.
                msg = input(">>> please input SDK cmd: ")

                # When the user enters Q or q, exit the current program.
                if msg.upper() == 'Q':
                        break

                # Add the ending character.
                msg += ';'

                # Send control commands to the robot.
                s.send(msg.encode('utf-8'))

                try:
                        # Wait for the robot to return the execution result.
                        buf = s.recv(1024)

                        print(buf.decode('utf-8'))
                except socket.error as e:
                        print("Error receiving :", e)
                        sys.exit(1)
                if not len(buf):
                        break

        # Disconnect the port connection.
        s.shutdown(socket.SHUT_WR)
        s.close()

if __name__ == '__main__':
        main()
Save the preceding code as rm_networking_connection_sdk.py.
Run the script.
Windows: After installing the Python environment, double-click the *.py file to run it. If you fail to run the file, press the
Win+Rshortcut command and enter ``cmd’’. Then, press Enter to open the CLI and enter ``python rm_networking_connection_sdk.py’’ to run the file.Linux: Press
Ctrl+Alt+Tto open the CLI and enterpython rm_networking_connection_sdk.pyto run the file.Establish a TCP/IP control connection.
When
Connecting...'' appears in the running window, the system is attempting to establish a connection with the robot. When ``Connected!;appears in the running window, the control connection has been established.
- Verify the connection
After successfully establishing the control connection, enter command on the CLI. If the robot returns ok;, the connection has been established and the robot has entered SDK mode. Then, you can enter control commands to control the robot.
2.3.3. USB connection
The USB connection method essentially uses the RNDIS protocol to virtualize the USB device on the robot as a network card and then initiate a TCP/IP connection via USB. For more information about RNDIS, refer to the RNDIS Wikipedia entry.
- Prepare the environment
- Prepare a PC with RNDIS enabled (check that RNDIS is ready on the PC.)
- Prepare a Micro-USB data cable.
- Establish a connection
Turn on the robot.
Turn on the robot without concerning yourself with the connection method switch.
Establish a USB connection
Connect one end of the USB data cable to the USB port on the smart central control of the robot and connect the other end to the PC.
Test the connection.
Open the CLI window and run the following command::
ping 192.168.42.2
If the CLI returns communication successful (as shown below), the connection is working properly, and you can proceed to the next step.:
PING 192.168.42.2 (192.168.42.2) 56(84) bytes of data.
64 bytes from 192.168.42.2: icmp_seq=1 ttl=64 time=0.618 ms
64 bytes from 192.168.42.2: icmp_seq=2 ttl=64 time=1.21 ms
64 bytes from 192.168.42.2: icmp_seq=3 ttl=64 time=1.09 ms
64 bytes from 192.168.42.2: icmp_seq=4 ttl=64 time=0.348 ms
64 bytes from 192.168.42.2: icmp_seq=5 ttl=64 time=0.342 ms

--- 192.168.42.2 ping statistics ---
5 packets transmitted, 5 received, 0% packet loss, time 4037ms
rtt min/avg/max/mdev = 0.342/0.723/1.216/0.368 ms
If the CLI returns Cannot access… or the response times out (as shown below), check whether the RNDIS service is correctly configured on the PC. Then, restart the vehicle to try again.:
PING 192.168.42.2 (192.168.42.2) 56(84) bytes of data.

--- 192.168.42.2 ping statistics ---
4 packets transmitted, 0 received, 100% packet loss, time 3071ms
Prepare the connection.
The connection process is similar to Wi-Fi direct connection -> Prepare the connection script, except that you must replace the IP address of the robot with the IP address in USB mode.
The modified sample code is as follows:
 1
 2
 3
 4
 5
 6
 7
 8
 9
10
11
# -*- encoding: utf-8 -*-
# Test environment: Python 3.6

import socket
import sys

# In USB connection mode, the default IP address of the robot is 192.168.42.2 and the control command port is port 40923.
host = "192.168.42.2"
port = 40923

# other code
- Verify the connection
After successfully establishing the control connection, enter command on the CLI. If the robot returns ok;, the connection has been established and the robot has entered SDK mode. Then, you can enter control commands to control the robot.
2.3.4. UART connection
- Prepare the environment
- Prepare a PC and check that the USB-to-serial module driver has been installed.
- Prepare a USB-to-serial module.
- Prepare three Dupont lines.
- Establish a connection
Turn on the robot.
Turn on the robot without concerning yourself with the connection method switch.
Connect to the UART port.
Attach one end of the Dupont lines to the GND, RX, and TX pins on the UART port of the main control of the robot chassis and the other end to the GND, TX, and RX pins of the USB-to-serial module.
Configure UART to establish a communication connection.
The following example uses the Python programming language to configure UART in the Windows operating system.
Check that the PC has recognized the USB-to-serial module and confirm the serial port in Device Manager > Ports, such as COM3.
Install the serial module.:
pip install pyserial
Program to implement UART control by referring to the following sample code:
 1
 2
 3
 4
 5
 6
 7
 8
 9
10
11
12
13
14
15
16
17
18
19
20
21
22
23
24
25
26
27
28
29
30
31
32
33
34
35
36
37
# -*- encoding: utf-8 -*-
# Test environment: Python 3.6
import serial

ser = serial.Serial()

# Set the baud rate to 115200, 8 data bits, 1 stop bit, no parity bit, and set the timeout period to 0.2 seconds for the serial port.
ser.port = 'COM3'
ser.baudrate = 115200
ser.bytesize = serial.EIGHTBITS
ser.stopbits = serial.STOPBITS_ONE
ser.parity = serial.PARITY_NONE
ser.timeout = 0.2

# Open the serial port.
ser.open()

while True:

        # Wait for the user to enter control commands.
        msg = input(">>> please input SDK cmd: ")

        # When the user enters Q or q, exit the current program.
        if msg.upper() == 'Q':
                break

        # Add the ending character.
        msg += ';'

        ser.write(msg.encode('utf-8'))

        recv = ser.readall()

        print(recv.decode('utf-8'))

# Close the serial port.
ser.close()
- Save the preceding code as rm_uart.py and run it.
- Verify the connection
After successfully establishing the control connection, enter command; on the CLI. If the robot returns ok;, the connection has been established and the robot has entered SDK mode. Then, you can enter control commands to control the robot.